
PICTOAUD
Pictoaud is an
SSTV (Slow Scan TeleVision) system devised by Samuel Hunt
some years ago. At the time it generated quite a bit of
interest but development in the mode seemed to end and the web site
disappeared. I recently decided to try and find the Pictoaud
software and after a few months of searching I found it!
Below are the most
interesting parts of the original web page reproduced without
permission.
"First
of all, the brief history:-
Pictoaud 1 was invented in
1998 by Samuel Hunt. It featured no start codes, no syncs and no noise
reduction. It, however, caught on because of where it was marketed. It
was marketed at small, isolated, communities who had a local radio
station which shut down during the night, and no local newspaper.
During the night, they would transmit the news of the day in picture
form, with captions across the airwaves.
The system had its
limitations, such as horrendous amounts of noise. So:-
Pictoaud 2 was created in
May 2000. By the same creator, this had little benefit, except a
complete, more efficient, code rewrite. Also, it had a form of noise
and time reduction. It did, however, suffer in much the same way as
Pictoaud 1.
Pictoaud 3 is the brand new
top of the range system. It has a much more efficient noise reduction
system, so noise is almost non-existent, and it offers full syncs and
line identifiers.
So,
how (Basically) does it work?
Let us presume it is
recorded on tape (For ease of explaining it. However it is stored or
transmitted, it is always the same form of signal).
Two "Demi Pixels" make up a
proper visible pixel. The first "Demi Pixel" is fixed at peak white.
The second is at the colour value.
This means that if the
signal drops in strength, then instead of going dark, both the pixels
go dark, so the lighter of the two is used to normalise the other, so
the effect is counteracted, and so you do not notice the effect.
On the last 5 pixels of
every line, these are below black. These are used to set the "pixel
tracer" back to the beginning of the line. This means that if a few
pixels go missing, then the whole picture does not shift to the left,
like Pictoaud 1 and 2 did.
On the first 11, there is a
digital line code. This is so that if more than 1 line is lost, then
colour missync does not occur. The last full line is repeated, so the
effect is not very obvious.
All of these methods are
mainly unnecessary over normal working conditions. This is why Pictoaud
1 and 2 worked. However, in weak signal areas, where a large area is
being covered by a small transmitter, then the system comes into its
own, since it can keep the picture in a viewable state long after
Pictoaud 1 and 2 would have given up.
This system is not perfect
in weak signals. In very weak signals, it just won't work. Since all of
the syncs are digital, then, like digital, they work perfectly up until
75% noise (At which point they, very suddenly, cease functioning!) Over
longer distances, some other mode may be better. However, try this
mode. The important thing is that this mode can RECOVER from major
disturbances, which no other mode can.
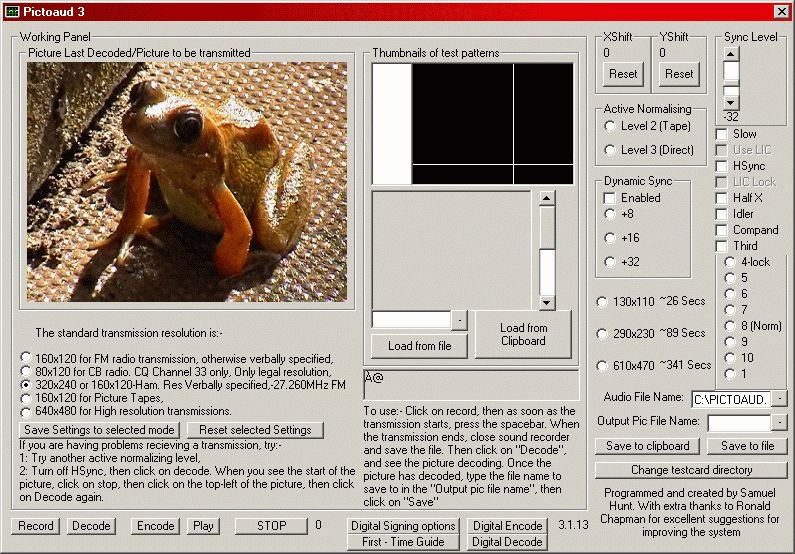
(screen shot by John R Wells, M5AML 2009)
So, how do I use the
program?
To encode, simply type in
the name of the file, then click on "Load from File", or you can paste
from the clipboard. The image will appear in the window..
Make sure the resolution is
correctly selected. It is better to crop than to cut areas off. It
saves transmission time substantially! One note:- Bear in mind the
recommended resolutions times, since these are generally more than
adequate.
Click on "Encode" to encode
the file, which will encode it to the specified audio file. When
encoding is complete, a dialog box will pop up alerting you of this
fact.
You can then play it through
the soundcard via sound recorder by clicking on "Play".
If you have done all this
correctly, you should hear the tones. Send these through the
transmitter, tape recorder, etc. Try not to lose any of the audio or
clip it.
For decoding:-
First, you want to click on
"Record", BEFORE the transmission begins. This will bring up sound
recoder, ready to record. WHEN you hear the pilot tone, press the
SPACEBAR. Recording will now commence. Click on the Stop (Square) to
stop recording when transmission has ended, then close sound recorder
and save the file.
So far, so good. Now, do a
setup run if you have never received from this person/played from this
tape before.
Turn OFF auto lining. This
is the line adding, but it improves the picture quality if you try and
get the picture in a good state before the auto lining does its work.
You want to try and have the
Resolution Manual Override ON for best detection (this doesn't take the
resolution from the resolution codes, but takes the resolution which
you force upon it), but you have to be certain what resolution the
picture is being transmitted at.
Everything should now be set
up for the trial run. Click on Decode, to run the trial decode. You
should see a small version of the picture decoding in a little box in
the top left of the program after a pause of a few seconds. If you see
NO PICTURE after at least 30 seconds (Just in case something is being
very slow), then click on STOP, and then turn off the Leader.
If you still REALLY can't
get a picture, then try turning off Horizonal Syncs, and trying again.
You should get a picture which is off-sync. If you haven't, then my
honest advice is - GIVE UP! Your source is probably corrupt!
Anyway, if it is too black
(All the blacks are washed out), then try changing the active
normalisation level, and turning back on the Horizontal Syncs.
Optimize the sync level. Set
it to minumum (-16), then start the decoding by clicking on Decode.
Click it up higher and higher (-24, then -32, then -48), until the
picture quality starts to degrade again. Find the optimum level, where
the vertical lines are straight, and don't jump from side to side.
Now, stop the decoding and
turn back on auto lining. Nothing appears during auto lining, until the
VERY END of the process, wherupon you see the picture quickly scan onto
the screen. If you got a good picture before, and you get no picture
now, then the LIC inset could be bad. Try experimenting with this (Run
with 7, then with 9, then with 6, then with 10, etc. until you get a
good picture)
Anyway, lets presume you get
a picture. You now, naturally, want to save it. The best way to save it
is to a file. Type the filename to save to, then click on Save to file.
Alternatively, you can save to the clipboard, so you can paste the
image into a better image editor (Like Paint Shop Pro 6, my
favourite!). To do this, click on Save to Clipboard.
You see, it wasn't really
that difficult! In fact, it was very easy!
Now,
about the software:-
You need 2 programs. The
first, obviously is Pictoaud. The second is RAW2WAV. This converts the
RAW audio file (Internal) to a WAV file (Usable by Sound Recorder).
The Raw2Wav should be copied
to the WINDOWS directory (C:\WINDOWS normally). This will never need to
be updated. This is a freeware program, not written by Samuel Hunt.
You may also want the test
images. Put them in whatever directory you want, and when the program
first starts, type in the directory.
Pictoaud can be copied to
whatever directory you like.
You MAY need the VB5 runtime
files. "
So that's about it!
Click HERE
to download both Pictoaud and Raw2Wav in one .zip file. VB5
runtime files should be available elsewhere on the internet.
Happy Pictoauding!

BACK