
ETCHING PRINTED CIRCUIT BOARDS
The simple method I use to create PCBs
Firstly the
PCB (printed circuit board) design is printed or
drawn onto paper. This paper is then taped to the copper-clad
board that will be the etched PCB.
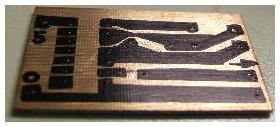 Then take an etch-resistant pen such as
an OHP pen (Stabilo etc.), a laundry marker or even a gardening tag
marker (i.e. free with Spalding catalogue) and draw your tracks on the
board. Make the tracks as dark and as thick as you can especially
where the holes will be drilled. Try to cover most of the board
with tracks so that you don't have to etch too much copper off.
Then take an etch-resistant pen such as
an OHP pen (Stabilo etc.), a laundry marker or even a gardening tag
marker (i.e. free with Spalding catalogue) and draw your tracks on the
board. Make the tracks as dark and as thick as you can especially
where the holes will be drilled. Try to cover most of the board
with tracks so that you don't have to etch too much copper off.
Once you are happy with the board its time to prepare your etchant.
I have used Ferric Chloride but I found this to be
messy especially when dribbled or spilt!
I now use Sodium Persuphate. Like Ferric Chloride it is
corrosive
so take
care! I always have some kitchen roll to hand to
wipe
my
hands and my
glasses protect my eyes to some degree. It is also wise to
have
some running water nearby or a tub of clean water in case you end up
covered in etchant!
 Sodium Persulphate can be purchased
in bags to make 500ml of solution. I use a suitably labeled
and washed glass
pickled onion jar to store the solution in. Once you've
finished
with the solution the lid can be put on the jar and it can be re-heated
next time.
Sodium Persulphate can be purchased
in bags to make 500ml of solution. I use a suitably labeled
and washed glass
pickled onion jar to store the solution in. Once you've
finished
with the solution the lid can be put on the jar and it can be re-heated
next time.
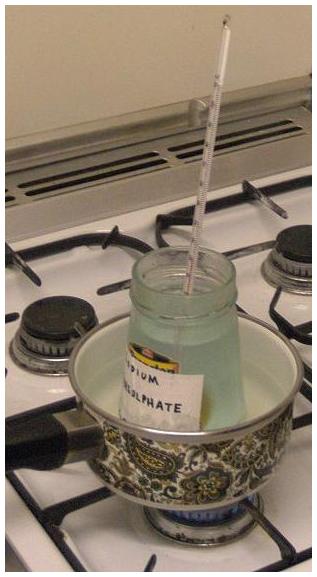
To heat the solution put some warm water in an enamel coated pan on the cooker, place the jar of solution in the pan with the lid off the jar! Turn on the gas, low, and monitor the temperature with a thermometer in the jar.
Do not heat the jar up too
quickly - it will
crack!!! (I have proved it)
Do not leave your Sodium Persulphate unattended!!!
Once the solution reaches 50°C its time to etch! But first wipe off the thermometer so that it doesn't corrode, and carry the pan with the jar and water still in it to your workbench. Lift the jar out of the pan onto your bench. The steam coming from the pan will be hotter than you think and so will the jar! It is best to transport your solution in this way to avoid accidents. Take care!
 Pour
some of the warm solution into an old plastic margarine tub (or
similar). Place the PCB to be etched in the margarine tub.
Now
gently rock the margarine tub from side to side to excite the solition
- this helps the etching process. Don't worry if your
board moves about in the solution. The photo on the right
shows a
board that has been put into some solution in a margarine tub ready for
etching.
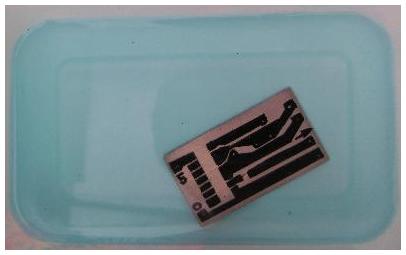
Pour
some of the warm solution into an old plastic margarine tub (or
similar). Place the PCB to be etched in the margarine tub.
Now
gently rock the margarine tub from side to side to excite the solition
- this helps the etching process. Don't worry if your
board moves about in the solution. The photo on the right
shows a
board that has been put into some solution in a margarine tub ready for
etching.
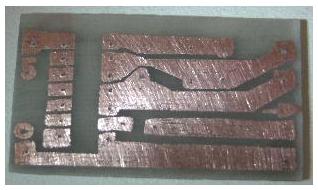
I find it is a good idea to go around the tracks with an ohmmeter to make sure there aren't any minute breaks or shorts. Any shorts can be removed with a knife, meter probe or pin. Any small gaps can be wired across,
The sodium persulphate solution can be used many times but will take on
a blueish tinge with use.
